- 1-888-927-3423 TOLL FREE: USA/Canada
- Contact
Shop our complete inventory of rinks, components & accessories
Ice Resurfacing
Ice resurfacing is truly one of my favorite things to do on my backyard ice rink. I enjoy it tremendously and look forward to the time I spend resurfacing our ice rink. For me, it is truly a very relaxing and peaceful experience.
At first ice resurfacing might sound a little complicated and troublesome but it is not. After a while, you get an instinct for when and how to do it efficiently.
There are many personal techniques you do pick up along the way.
First and foremost, ice resurfacing should be done at night when the temperature drops and there is no sunlight, preferably on a non-windy night and when there is no snow falling. This will create a ripple-free, non-bumpy ice surface.
Prior to resurfacing, you should remove as much snow as possible off the ice. You can use a flat shovel to get the snow off. Consider brooming the snow off the ice. Getting it all off does provide a smoother finish to the end result.
Assuming at this point you have adequate ice depth, there are several methods you can use to resurface, depending on the time you have and the final quality you wish to achieve.
Use Your Yard Hose!
You could quickly resurface using your regular yard hose. Start at one end and move very slowly across the surface. As you move, keep the end of your hose on the ice so as not to create a splash. Always step/stand on the side you are not spreading.
You could use cold or hot water, but if the temperature is very low, attaching your hose to hot water and flooding your surface with a very small layer of hot water produces the best finish. You will need a Sink Faucet to Hose Adaptor in order to run hot water through your hose.
You should know that if you play or train for hockey on your outdoor ice skating rink, skating and stick handling on a surface finished with hot water is awesome. It produces a very nice, flat and smooth surface! Probably the best finish of all.
When using hot water, please be careful not to leave your hose running alone on the ice. Leaving your hot water running onto the ice on the same spot for as little as 10 seconds is enough to melt a hole right through your thick ice foundation.
You'll not be able to resurface or flood until you've patched the hole.
Cold water left running will also melt your ice, however it will take much, much longer. When flooding with cold water during a very cold night, you can afford to leave a cold water hose running outside alone and come back after a couple of minutes to move it.
Dumping it!
Another method, which is a little more complicated but produces a very nice, evenly level ice surface, involves dumping a large amount of water on the ice at once. You would fill up a large barrel, or several barrels depending on your rink size. Once they are all full you can just dump all the water onto the ice at the same time.
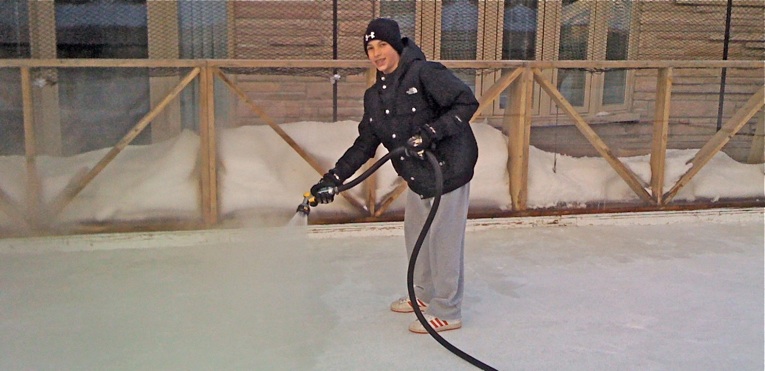
Ice Resurfacing Tools, Equipment and Machinery
There are also many resurfacing tools and equipment you can buy as well, which wil make the task of ice resurfacing so much easier!
Free Periodical mybackyardicerink
Online Rink Magazine (E-zine)
Please subscribe to my online rink magazine, mybackyardicerink.
Keep up to date with the latest information on My Backyard Ice Rink!
Like mybackyardicerink.com?
New! Comments
+1 mybackyardicerink
Site
+1 mybackyardicerink
Site
Keep up to date with the latest information on My Backyard Ice Rink!
Sign up for my FREE newsletter: